FUEL FILTRATION: Part II .. continued
written by: Harry Lewellyn
|
|
This article is a reprint from the Bonus Issue of FOURWHEELING ACADEMY.
The FOURWHEELING ACADEMY is a regular part of the "Ecological 4Wheeling Adventures" Newsletter.

|
FILTER REMOVAL |
|
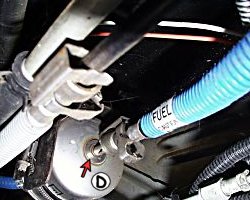
FIGURE 2
Typical canister type fuel filter installation.
|
Fuel filter replacement simplicity varies. Most are located on one of the frame rails under
the 4X, ahead of the rear wheels. Some require special tools. [Figure 2] shows a typical installation.
|
|
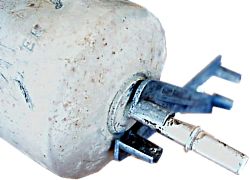
Figure 4-1
|
Take note of the fuel flow direction arrow printed on the filter see
[Figure 1-b]). Remember this when installing the new filter. Although it will work for a short while in either
direction, it is best to install it as designed.
|
|
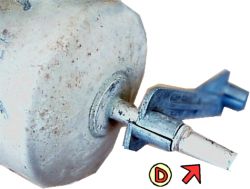
Figure 4-2
|
The pictures on your left show examples of unique connectors and retention methods. Figure
4-1 is the tool that I carry ready to clamp onto the tube. Figure 4-2 is the closed tool slid up to the retainer snap ring ridge.
|
|
For this type, you must basically:
- remove the connector safety clip
- slip the "half shells" over the tube/pipe/hose
- then slide them into and under the hidden retention, snap ring, and finally
- withdraw the filter
It is impossible to separate filter and tube without the tool or equivalent. I've
improvised a field tool with a perfect size pipe, sawed in half, axially, and slipped under the retention snap ring. That's not easy!
|
CONTINUED FUEL LEAKAGE |
|
I've also learned fuel may continue to "siphon" out of the tank-side tube
after the initial pressure burst. Be prepared to plug that tube if necessary. My "best" steel tube plug is actually a piece of tightly
fitting plugged rubber hose. You can immediately slip this over the tube to stop fuel leakage. Think outside for rigid tube. For rubber hose, I
simple plug it with something like a cap screw. Think inside for rubber hose.
If there are flex connections at the filter, I recommend disconnecting the inlet and outlet tubes prior to unbolting the
filter retainer. The stabilized filter makes it easier to remove the flex tubes. Disconnect the inlet tube first so that it may be immediately
plugged per above. If you disconnect the outlet first, fuel may leak at the open outlet all during the time you are struggling with the inlet
tube.
|
FILTER REPLACEMENT |
|
Install the inlet and outlet tubes/hoses to the filter and then reattach the filter to the
holder. Some filters may require you first secure the filter, then reattach the hoses. The ones that require a special tool are a "snap" to
install. You just push the filter into the connector and listen for a distinctive snap. For all of the above, you want to connect the outlet first.
If you connect the inlet first, the fuel will run from the outlet while you are connecting the last fitting.
Immediately start the engine and check for leaks from afar. Don't put your face right up next to the filter! 60 PSI
moves lots of fuel, real fast, with high force. Finally, properly dispose of the old filter and fuel-spill rags.
|
FIELD REPAIR |
|
Since a "perfectly" clean filter is not required for "perfect" running,
try this in a pinch. Remove the dirty filter. Fill it with gasoline from both ends. Now put your fingers over the inlet and outlet tubes and shake
vigorously. Finally, pour the fuel out of both the inlet (first), then the outlet. Remember, the inlet side of the filter is where the dirt is
located. Do this several times. You may want to continue until the inlet fuel "pours" clean. You should eventually be able to pour fuel in
the inlet and see clean fuel freely flow out the outlet.
|
PRACTICE AT HOME |
|
Knowing how to change the fuel filter in the field is definitely useful, but first, practice at home.
FOOTNOTES
- WIX Service Manual, page 10
- WIX Service Manual, page 11 & 13
- WIX technical support correspondence
- WIX technical support correspondence
- WIX Service Manual, page 24
- Napa
- www.autosupplyco.com
- WIX Service Manual, page 24
|
|
FUEL FILTRATION : : [ PAGE 1 ] : : [ PAGE 2 ]
STILL CONFUSED? CHECK OUT [ EFI 101 ]
|
About the Author |
|
Harry Lewellyn is the author of "
SHIFTING into 4WD" and the "California OHV Guidebook" produced by the state of
California Department of Parks and Recreation.
He leads 4WD trips throughout the US, Baja and mainland Mexico.
|
