|
 When meeting my students or clients the day of a class or the first day of
training, I start the session at a local 4-wheel drive store. I take people on a short tour of the
facility. There are many aftermarket accessories displayed effectively for me to make several
points about the various types of suspensions, tires, bumpers, lights, axles, and the other
components that make up a 4WD vehicle, and also to accessorize it. There are axle shafts,
freewheeling hubs, differentials and drive shafts, all there for me to show what each looks like
and talk a little about the pros and cons of each. In my talk about these aftermarket items, there
are three things that I always try to emphasize. If you’ve read any of my other articles,
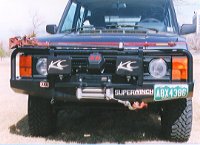
you know that I strongly recommend you always take along: 1) tow hooks, 2) recovery strap,
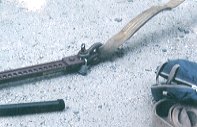
and 3) Hi-Lift jack. This article is dedicated to the Hi-Lift Jack.
When meeting my students or clients the day of a class or the first day of
training, I start the session at a local 4-wheel drive store. I take people on a short tour of the
facility. There are many aftermarket accessories displayed effectively for me to make several
points about the various types of suspensions, tires, bumpers, lights, axles, and the other
components that make up a 4WD vehicle, and also to accessorize it. There are axle shafts,
freewheeling hubs, differentials and drive shafts, all there for me to show what each looks like
and talk a little about the pros and cons of each. In my talk about these aftermarket items, there
are three things that I always try to emphasize. If you’ve read any of my other articles,
you know that I strongly recommend you always take along: 1) tow hooks, 2) recovery strap,
and 3) Hi-Lift jack. This article is dedicated to the Hi-Lift Jack.
 I’ve been using a Hi-Lift since I was a kid in the Everglades. We used
them to lower the swamp buggies and airboats off the trailers and to pull them back on. We used
them to lift the big swamp buggy tires onto the rigs and for a great many other tasks. I have been
using the jack for 4WD recovery ever since. Earlier this year, I was lucky enough to meet the
great people at the Bloomfield Manufacturing Company in Indiana. They gave Rachel and me a warm
welcome and a fun, educational tour of the factory, and reinforced my strong feelings about this
well-made and invaluable product.
I’ve been using a Hi-Lift since I was a kid in the Everglades. We used
them to lower the swamp buggies and airboats off the trailers and to pull them back on. We used
them to lift the big swamp buggy tires onto the rigs and for a great many other tasks. I have been
using the jack for 4WD recovery ever since. Earlier this year, I was lucky enough to meet the
great people at the Bloomfield Manufacturing Company in Indiana. They gave Rachel and me a warm
welcome and a fun, educational tour of the factory, and reinforced my strong feelings about this
well-made and invaluable product.
 The Hi-Lift Jack is the only one of its type that meets ANSI standards and is
made in the USA with USA steel and parts! As many years as I have been using the Hi-Lift Jack I
learned something new--the direction lever (up and down) should always be in the "up"
position when the jack is stored. The pins could sustain damage from trail and supermarket impact
if in the down position.
The Hi-Lift Jack is the only one of its type that meets ANSI standards and is
made in the USA with USA steel and parts! As many years as I have been using the Hi-Lift Jack I
learned something new--the direction lever (up and down) should always be in the "up"
position when the jack is stored. The pins could sustain damage from trail and supermarket impact
if in the down position.
 There are two types of manufactured jacks: 1) the cast and steel, and 2) the
all cast. It has been shown that the all cast seems to last a bit longer under harder use,
although the cast and steel type lasts for many years. I had an old cast and steel 48" jack I
bought at a flea market for $15 bucks that was old to begin with, and I still got about 15 years
use out of it! Then I passed it on to a friend who still has it hanging on his Bronco today. The
all cast jack costs a little bit more. The difference is that on the cast and steel the top clamp
clevis, the foot piece (base), handle socket, reversing latch and pitman are stamped steel. All
parts of both jacks are made on site and meet all the demanding tests. Each jack is fully tested
at the factory. Both jacks have a 7000 pound capacity and will lift, push, pull, hoist and clamp
equally!
There are two types of manufactured jacks: 1) the cast and steel, and 2) the
all cast. It has been shown that the all cast seems to last a bit longer under harder use,
although the cast and steel type lasts for many years. I had an old cast and steel 48" jack I
bought at a flea market for $15 bucks that was old to begin with, and I still got about 15 years
use out of it! Then I passed it on to a friend who still has it hanging on his Bronco today. The
all cast jack costs a little bit more. The difference is that on the cast and steel the top clamp
clevis, the foot piece (base), handle socket, reversing latch and pitman are stamped steel. All
parts of both jacks are made on site and meet all the demanding tests. Each jack is fully tested
at the factory. Both jacks have a 7000 pound capacity and will lift, push, pull, hoist and clamp
equally!
Even with a winch I have had to use the Hi-Lift jack. Sometimes I have been
hung up on a stump or rock and winching will tear my transfer case out. I’ll lift the rig
up, then winch carefully off the obstacle.
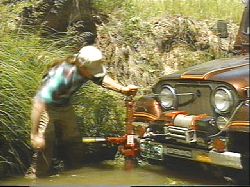 Recently, I was in the New Jersey Pine Barrens, and one of the deep pockets of quicksand was not letting go of my rig. My
Superwinch S9000 was pulling two vehicles to me, and my D-90 was still not moving out of the hole.
I had to use the Hi-Lift jack to lift the front of the vehicle up to break the suction, then winch
out of the stuck situation. I have always used the 60" jack because it gives me an extra foot
of lift or when using it as a hand winch extra distance to pull before I re-rig it. The 48"
jack works for those rigs with standard tires and suspensions. With long travel suspensions and
taller tires, the 60" really works best. There are a few Hi-Lift accessories that make life
easier. The bumper adapter is great for holding onto those metal edges of bumpers and can be
adapted to fit other types of bumpers. The lock rack and bumper mount kit are great to secure the
jack on the outside of the rig. There is also a "fix-it-kit" that is handy to have just
in case. I haven’t had to use mine yet in all these years, but you know Murphy, so I carry
one anyway!
Recently, I was in the New Jersey Pine Barrens, and one of the deep pockets of quicksand was not letting go of my rig. My
Superwinch S9000 was pulling two vehicles to me, and my D-90 was still not moving out of the hole.
I had to use the Hi-Lift jack to lift the front of the vehicle up to break the suction, then winch
out of the stuck situation. I have always used the 60" jack because it gives me an extra foot
of lift or when using it as a hand winch extra distance to pull before I re-rig it. The 48"
jack works for those rigs with standard tires and suspensions. With long travel suspensions and
taller tires, the 60" really works best. There are a few Hi-Lift accessories that make life
easier. The bumper adapter is great for holding onto those metal edges of bumpers and can be
adapted to fit other types of bumpers. The lock rack and bumper mount kit are great to secure the
jack on the outside of the rig. There is also a "fix-it-kit" that is handy to have just
in case. I haven’t had to use mine yet in all these years, but you know Murphy, so I carry
one anyway!
I have used the jack to hold my axle to the frame with a log as a spacer when
I broke a leaf spring once. You can imagine the looks I got on the highway on the ride home with
the top of the jack sticking out of the engine compartment and a log in my wheel well! I was able
to drive home and fix the problem in my garage and not on the muddy trail (even if I could find a
spring in the woods).
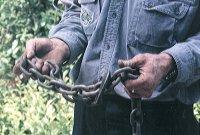
A basic list of equipment to carry with the Hi-Lift jack when using it as a
recovery and lifting tool while on the trail would be: two short slings or tree protector straps
(8' x 3"), 3 D-shackles 3/4" pin diameter min., 25 feet of 3/8" chain with
holding hooks--high grade tensile strength--work gloves, a board approx. 18" square or
diameter with a bolt in the middle that fits the hole in the jack base, and for extreme cases,
25' or 50' of 5/16" cable (wire rope).
 The board is so you don’t drive the base of
the jack into the mud. The bolt is when the board gets off kilter, the jack does not slide off the
board. This is for the lifting procedure. The wire rope is to extend your reach when using the
jack as a hand winch. I have used a Pull-Pal portable anchor successfully many times with the
jack.
The board is so you don’t drive the base of
the jack into the mud. The bolt is when the board gets off kilter, the jack does not slide off the
board. This is for the lifting procedure. The wire rope is to extend your reach when using the
jack as a hand winch. I have used a Pull-Pal portable anchor successfully many times with the
jack.
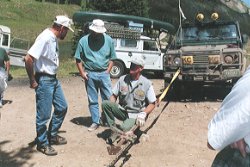
 You get stuck! Ascertain why and on what you are stuck. Sometimes it’s best to pull the vehicle out backwards!
To rig the Hi-Lift jack for hand winching, you simply connect an end of one of the straps to the tow hook or in your
receiver. The other end of the strap is connected with a D shackle to the top clamp clevis of
the jack. The top clamp clevis should be in straight alignment with the jack, not in its clamping
position. The base of the jack is facing away from the vehicle. Place the other strap around a
suitable tree or anchor, taking care not to chafe the tree bark. If using
a Pull-Pal, you do not need to use this other strap. Use a D shackle to connect the strap around
the tree, or place the D shackle in the end of the Pull-Pal and run the chain through the D
shackle enough to connect the hook to a link. Do not put the point of the hook in the link hole.
The hook should be made so that the link fits in the hook jaw and will hold the entire load to
tensile strength.
You get stuck! Ascertain why and on what you are stuck. Sometimes it’s best to pull the vehicle out backwards!
To rig the Hi-Lift jack for hand winching, you simply connect an end of one of the straps to the tow hook or in your
receiver. The other end of the strap is connected with a D shackle to the top clamp clevis of
the jack. The top clamp clevis should be in straight alignment with the jack, not in its clamping
position. The base of the jack is facing away from the vehicle. Place the other strap around a
suitable tree or anchor, taking care not to chafe the tree bark. If using
a Pull-Pal, you do not need to use this other strap. Use a D shackle to connect the strap around
the tree, or place the D shackle in the end of the Pull-Pal and run the chain through the D
shackle enough to connect the hook to a link. Do not put the point of the hook in the link hole.
The hook should be made so that the link fits in the hook jaw and will hold the entire load to
tensile strength.
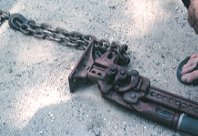 Run the other end of the chain to the jack. Again, the wire rope is to extend the reach of the assembly. Always use
the chain first at the jack tongue, then extend the reach with the wire rope between the chain and the anchor.
Run the other end of the chain to the jack. Again, the wire rope is to extend the reach of the assembly. Always use
the chain first at the jack tongue, then extend the reach with the wire rope between the chain and the anchor.
|
|
With the chain, you can tighten the rigging by
"choking" the chain (shortening it) and connecting the hook to an appropriate link. The
chain is looped around the tongue of the jack. Now get the rigging as tight as possible and begin
to jack using the handle. Use work gloves and watch your fingers.
 The vehicle will begin to move as you jack. Be careful it doesn’t roll
over you and watch closely the tires and steering, keeping it aligned to where you want to go. It
may take a full jack length to set the Pull-Pal. Once the jack is all the way to the top, secure
the vehicle from rolling back in the hole. Move the jack reversing lever down. Loosen the chain.
Choke the chain tight and begin again. I have found it sometimes takes 2 or 3 jack lengths to get
a vehicle out.
The vehicle will begin to move as you jack. Be careful it doesn’t roll
over you and watch closely the tires and steering, keeping it aligned to where you want to go. It
may take a full jack length to set the Pull-Pal. Once the jack is all the way to the top, secure
the vehicle from rolling back in the hole. Move the jack reversing lever down. Loosen the chain.
Choke the chain tight and begin again. I have found it sometimes takes 2 or 3 jack lengths to get
a vehicle out.
I have also found that, on occasion, there are no good anchor points and no
Pull-Pal available. I have then had to lift each corner and build an elevated road bed. This
procedure takes time, but you are stuck and going nowhere fast anyway, right? This usually happens
in boggy areas where there are deep ruts and the vehicle is high-centered.
Take the time to gather large rocks or log pieces not stones or brushwood.
Lift each corner up as high as needed, bringing the tire into the air. Build 2 or 3 feet of road
(or longer) at each tire extending in the direction you want to go. Sometimes it only takes that
much of a start to get the vehicle going again.
Once out, go back and repair the trail damage, replace the rocks and
log pieces off the trail (kinda’ like replacing your divot in golf) and carry on!
There was a time when the trail was off-camber and my
lockers walked me off the edge to a precarious situation. The winch started out okay, but then the
rig began to slide like a pendulum. I got out the Hi-Lift and anchored the rear of the vehicle
using the hand winch method and brought the back end back a little. I got in and started winching
again. As the vehicle started to "stretch," I spun the tires a little and the vehicle
slipped sideways back onto the road off the edge. Whew! That was one day I was glad I had all my
recovery equipment with me!
When using these methods of recovery take care with lights, body panels, and fingers, and do not overstress the equipment.
|